Thursday, July 23, 2015

How to import a server certificate to WSO2 key stores

Recently I was testing Nginx's load balancing capability with a WSO2 Application Server cluster which was consisted of one manager and two worker nodes fronted by an Nginx load balancer. I managed to successfully test the dep sync functionality by directly calling the manager/worker nodes of my cluster.

How ever when I tried to send HTTPS requests through the load balancer I encountered ssl certificate errors. Reason being the certificate setup for Nginx when setting up the cluster being not available inside our WSO2 key stores.

As a solution I imported the server.crt certificate file to WSO2 key stores and carry out my intended operations as expected without any certificate trouble. Here is how to do it.

1. Issue the following command which will give you basic certificate details and prompt a question. (It is assumed that both server.crt and wso2carbon.jks is in same folder; or else give the path accordingly)

> keytool -import -file server.crt -alias nginx -keystore wso2carbon.jks -storepass wso2carbon

Owner: EMAILADDRESS=sameera@wso2.com, CN=Sameera, OU=Carbon, O=WSO2, L=Colombo, ST=Western, C=SL
Issuer: EMAILADDRESS=sameera@wso2.com, CN=Sameera, OU=Carbon, O=WSO2, L=Colombo, ST=Western, C=SL
Serial number: 8b1edfc651beb3a3
Valid from: Tue Jun 16 19:40:22 IST 2015 until: Wed Jun 15 19:40:22 IST 2016
Certificate fingerprints:
  MD5:  1C:50:BB:9A:A1:01:49:D9:19:D2:BC:60:8F:6A:9A:11
  SHA1: 75:5D:B8:1B:F7:9F:05:46:BC:07:BA:C2:0E:7D:B1:B4:58:17:26:27
  SHA256: 17:C3:73:0E:D7:24:28:E5:FB:FE:A5:C4:C8:D9:A4:07:55:59:BA:55:37:1B:E8:14:12:64:7F:16:7A:A6:C3:C9
  Signature algorithm name: SHA256withRSA
  Version: 1


Question being asked is,

Trust this certificate? [no]:  yes

2. Type yes as shown above and press enter. You will get a response as follows.


Certificate was added to keystore


That's it. :)


> keytool -list -alias nginx -keystore client-truststore.jks -storepass wso2carbon -v
> keytool -list -alias nginx -keystore wso2carbon.jks -storepass wso2carbon -v

Sample output:

Alias name: nginx
Creation date: Aug 21, 2015
Entry type: trustedCertEntry

Owner: EMAILADDRESS=user@comp.com, CN=user, OU=Carbon, O=COMP, L=Colombo, ST=Western, C=SL
Issuer: EMAILADDRESS=user@comp.com, CN=user, OU=Carbon, O=COMP, L=Colombo, ST=Western, C=SL
Serial number: 8b1edfc651beb3a3
Valid from: Tue Jun 16 14:10:22 UTC 2015 until: Wed Jun 15 14:10:22 UTC 2016
Certificate fingerprints:
  MD5:  1C:50:BB:9A:A1:01:49:D9:19:D4:BC:60:8F:6A:9A:11
  SHA1: 75:5D:B8:1B:F7:9F:05:46:BC:27:BA:C2:0E:7D:B1:B4:58:17:26:27
  SHA256: 17:C3:73:0E:D7:24:28:E5:FB:FE:A5:C4:C4:D9:A4:07:55:59:BA:55:37:1B:E8:14:12:64:7F:16:7A:A6:C3:C9
  Signature algorithm name: SHA256withRSA
  Version: 1

Tuesday, June 30, 2015

HTTP load balancing with Nginx using simple HTTP python server instances

Introduction:
In this article we will be discussing how to perform HTTP load balancing with Nginx. For this purpose we will be using a simple HTTP python server. Three instances will be run on ports 8080, 8081 and 8082. Then by using cURL command (written in a shell script) we will be sending HTTP requests to the custom port.

Prerequisites:
1. Nginx installed on your OS.
You can find many articles in internet on how to install Nginx in your OS.

Content:
1. Configuring and starting Nginx
2. Starting three python HTTP server instances
3. Sending HTTP requests using cURL command embedded in a Shell script.
4. Monitoring output.
5. Stopping servers.
6. Errors

1. Configuring and starting Nginx
Goto your Nginx installation directory and find the nginx.conf configuration file.
e.g.: In my Mac OSX the path to nginx.conf is /usr/local/etc/nginx

In your nginx.conf file make sure the following line exists.
include servers/*;
This is because we are writing our custom configuration file inside the server directory.

You don't have to change the default port unless you get a conflict in starting Nginx.
If you are getting an Address already in use error please change your nginx.conf listen port as follows.
In http -> server section change the port according to your need.
e.g.: I have set it as listen 9980; since I got an Address already in use error at the beginning.

Now we are going to create the Nginx configuration file inside the server directory needed for our use case.
Go to servers directory inside your nginx installation directory, create a new file name localhost.conf.
servers/
└── localhost.conf

Paste the following content to it.

http {
        upstream localhost {
                server localhost:8080 ;
                server localhost:8081 ;
                server localhost:8082 ;
        }

        server {
                listen 8880;
                server_name localhost;
                location / {
                        proxy_pass http://localhost;
                }
        }

}

Now your Nginx configuration is complete.

Start Nginx server.
e.g.: Issue the following command
> nginx

Verify the Nginx Listening ports as follows.

Suhans-MacBook-Pro:nginx suhanr$ lsof -i TCP:9980 | grep LISTEN
nginx   96779 suhanr    6u  IPv4 0x4725c99a7ff095e9      0t0  TCP *:9980 (LISTEN)
nginx   96780 suhanr    6u  IPv4 0x4725c99a7ff095e9      0t0  TCP *:9980 (LISTEN)
Suhans-MacBook-Pro:nginx suhanr$ lsof -i TCP:8880 | grep LISTEN
nginx   96779 suhanr    8u  IPv4 0x4725c99a820272a9      0t0  TCP *:cddbp-alt (LISTEN)
nginx   96780 suhanr    8u  IPv4 0x4725c99a820272a9      0t0  TCP *:cddbp-alt (LISTEN)

If you have not used the default listening port in nginx.conf configuration skip lsof -i TCP:9980 | grep LISTEN step.

2. Starting three python HTTP server instances
In your working directory (any directory at your convenience), create a python file called backend.py and paste the following content to it. This is our simple HTTP python server.

#!/usr/bin/python

#backend.py
from BaseHTTPServer import BaseHTTPRequestHandler,HTTPServer
import sys
import logging

logging.basicConfig(filename='var/log/loadtest.log',level=logging.DEBUG,format='%(asctime)s %(message)s', datefmt='%m/%d/%Y %I:%M:%S %p')

#This class will handles any incoming request from the browser.
class myHandler(BaseHTTPRequestHandler):

    #Handler for the GET requests
    def do_GET(self):
        logging.debug("Request received for server on : %s " % PORT_NUMBER)
        self.send_response(200)
        self.send_header('Content-type','text/html')
        self.end_headers()
        # Send the html message
        self.wfile.write("Hello World: %s" % PORT_NUMBER)
        self.wfile.write("")
        return

try:
    #Create a web server and define the handler to manage the
    #incoming request
    PORT_NUMBER = int(sys.argv[1])
    server = HTTPServer(('', PORT_NUMBER), myHandler)
    print 'Started httpserver on port %s '  %  sys.argv[1]
    #Wait forever for incoming htto requests
    server.serve_forever()

except KeyboardInterrupt:
    print '^C received, shutting down the web server'
    server.socket.close()

Save the file.

Create a directory structure as follows inside your working directory.
var/
└── log

Next start 3 instances of HTTP python server as follows.
> nohup python backend.py 8080 &
> nohup python backend.py 8081 &
> nohup python backend.py 8082 &

Following is my console output.

Suhans-MacBook-Pro:NGINX suhanr$ nohup python backend.py 8080 &
[8] 94968
Suhans-MacBook-Pro:NGINX suhanr$ appending output to nohup.out
Suhans-MacBook-Pro:NGINX suhanr$ nohup python backend.py 8081 &
[9] 94969
Suhans-MacBook-Pro:NGINX suhanr$ appending output to nohup.out
Suhans-MacBook-Pro:NGINX suhanr$ nohup python backend.py 8082 &
[10] 94970
Suhans-MacBook-Pro:NGINX suhanr$ appending output to nohup.out

Verify the python HTTP server instances running ports as follows.

Suhans-MacBook-Pro:nginx suhanr$ lsof -i TCP:8080 | grep LISTEN
Python  97146 suhanr    5u  IPv4 0x4725c99a84b99059      0t0  TCP *:http-alt (LISTEN)
Suhans-MacBook-Pro:nginx suhanr$ lsof -i TCP:8081 | grep LISTEN
Python  97147 suhanr    5u  IPv4 0x4725c99a7ef91449      0t0  TCP *:sunproxyadmin (LISTEN)
Suhans-MacBook-Pro:nginx suhanr$ lsof -i TCP:8082 | grep LISTEN
Python  97162 suhanr    5u  IPv4 0x4725c99a8500d5e9      0t0  TCP *:us-cli (LISTEN)

3. Sending HTTP requests using cURL command embedded in a Shell script
Create a file called requestgen.sh and paste the following content to it.

#!/bin/bash
c=1
count=$1
echo $count
while [ $c -le $count ]
do
     curl http://localhost:8880/
     (( c++ ))
done

This will send pre determined number of HTTP requests to the 8880 port of which Nginx is listening.
Issue the following command.
> sh requestgen.sh 10

Suhans-MacBook-Pro:NGINX suhanr$ sh requestgen.sh 10
10
Hello World: 8082Hello World: 8080Hello World: 8081Hello World: 8082Hello World: 8080Hello World: 8081Hello World: 8082Hello World: 8080Hello World: 8081Hello World: 8082

4. Monitoring output
i. tail -f nohup.out
You will observe a similar output as follows.

Suhans-MacBook-Pro:NGINX suhanr$ tail -f nohup.out 
127.0.0.1 - - [30/Jun/2015 16:53:19] "GET / HTTP/1.0" 200 -

ii. tail -f var/log/loadtest.log

Suhans-MacBook-Pro:NGINX suhanr$ tail -f var/log/loadtest.log 
06/30/2015 05:10:14 PM Request received for server on : 8082 
06/30/2015 05:10:14 PM Request received for server on : 8080 
06/30/2015 05:10:14 PM Request received for server on : 8081 
06/30/2015 05:10:14 PM Request received for server on : 8082 
06/30/2015 05:10:14 PM Request received for server on : 8080 
06/30/2015 05:10:14 PM Request received for server on : 8081 
06/30/2015 05:10:14 PM Request received for server on : 8082 
06/30/2015 05:10:14 PM Request received for server on : 8080 
06/30/2015 05:10:14 PM Request received for server on : 8081 
06/30/2015 05:10:14 PM Request received for server on : 8082

5. Stopping servers
i. Stopping nginx
> nginx -s stop

i. Stopping python HTTP servers
Bring the processes to foreground by referring the job number.
You can find the job number from the console output shown above in section 2; refer the console output after starting the 3 python server instances.


Suhans-MacBook-Pro:NGINX suhanr$ fg 8
nohup python backend.py 8080
^CSuhans-MacBook-Pro:NGINX suhanr$ fg 9
nohup python backend.py 8081
^CSuhans-MacBook-Pro:NGINX suhanr$ fg 10
nohup python backend.py 8082
^CSuhans-MacBook-Pro:NGINX suhanr$ 

Then by issuing a Ctrl+C command you can stop the servers.
Then you can observe the following log entry in your nohup.out file.

Suhans-MacBook-Pro:NGINX suhanr$ tail -f nohup.out
Started httpserver on port 8080 
^C received, shutting down the web server
Started httpserver on port 8081 
^C received, shutting down the web server
Started httpserver on port 8082 
^C received, shutting down the web server


6. Errors

i. When starting Nginx, Address already in use error.
nginx: [emerg] bind() to 0.0.0.0:8080 failed (48: Address already in use)

Solution: Change the nginx installation directory nginx.conf files listen port to a different one. e.g.: 9980.

ii. loadtest.log not found

Solution: Create a directory structure var/log if you missed to create as instructed in step 2.
var/
└── log
    └── loadtest.log

Useful links:
[1] https://docs.wso2.com/display/CLUSTER420/Configuring+Nginx

Friday, June 26, 2015

WSO2 API Manager - Modify token API to return with Access-Control-Allow-Origin Response Header

By default API Manager is not returning Access-Control-Allow-Origin response header in token API.

You can easily do this by modifying the _TokenAPI_.xml at
<AM_HOME>/repository/deployment/server/synapse-configs/default/api/
by including the above property to the out sequence just before the send mediator.

I have tested this with AM 1.7.0 and please find the modified _TokenAPI_.xml as follows.

<api xmlns="http://ws.apache.org/ns/synapse" name="_WSO2AMTokenAPI_" context="/token">
    <resource methods="POST" url-mapping="/*" faultSequence="_token_fault_">
        <inSequence>
            <send>
                <endpoint>
                    <address uri="https://localhost:9443/oauth2/token"/>
                </endpoint>
            </send>
        </inSequence>
        <outSequence>
                <property name="Access-Control-Allow-Origin"
value="http://192.168.1.5:80,http://192.168.10.200:80,https://dev.wso2.com,https://sup.wso2.com"
scope="transport"
type="STRING"/>
            <send/>
        </outSequence>
    </resource>
    <handlers>
        <handler class="org.wso2.carbon.apimgt.gateway.handlers.ext.APIManagerCacheExtensionHandler"/>
    </handlers>
</api>

I have tested by sending a cURL request to this token API as follows.

curl -vk -d "grant_type=password&username=admin&password=admin" -H "Authorization: Basic Vnc5cXhhWHE5WGo1Wl8xdWVvc3FEbFN0d1RBYTpJTVNsV0ZOQ01KN1JmRmtPT1RpZF9iTWpWZlFh, Content-Type: application/x-www-form-urlencoded" https://localhost:8243/token

cURL command console output is as follows.

Suhans-MacBook-Pro:bin suhanr$ curl -vk -d "grant_type=password&username=admin&password=admin" -H "Authorization: Basic Vnc5cXhhWHE5WGo1Wl8xdWVvc3FEbFN0d1RBYTpJTVNsV0ZOQ01KN1JmRmtPT1RpZF9iTWpWZlFh, Content-Type: application/x-www-form-urlencoded" https://localhost:8243/token
* Hostname was NOT found in DNS cache
*   Trying 127.0.0.1...
* Connected to localhost (127.0.0.1) port 8243 (#0)
* TLS 1.2 connection using TLS_ECDHE_RSA_WITH_AES_256_CBC_SHA384
* Server certificate: localhost
> POST /token HTTP/1.1
> User-Agent: curl/7.37.1
> Host: localhost:8243
> Accept: */*
> Authorization: Basic Vnc5cXhhWHE5WGo1Wl8xdWVvc3FEbFN0d1RBYTpJTVNsV0ZOQ01KN1JmRmtPT1RpZF9iTWpWZlFh, Content-Type: application/x-www-form-urlencoded
> Content-Length: 49
> Content-Type: application/x-www-form-urlencoded
>
* upload completely sent off: 49 out of 49 bytes
< HTTP/1.1 200 OK
< Access-Control-Allow-Origin: http://192.168.1.5:80,http://192.168.10.200:80,https://dev.wso2.com,https://sup.wso2.com
< Content-Type: application/json
< Pragma: no-cache
< Cache-Control: no-store
< Date: Fri, 26 Jun 2015 06:08:36 GMT
* Server WSO2-PassThrough-HTTP is not blacklisted
< Server: WSO2-PassThrough-HTTP
< Transfer-Encoding: chunked
<
* Connection #0 to host localhost left intact
{"scope":"default","token_type":"bearer","expires_in":3299,"refresh_token":"e8a1c130b372a0021f46bf9933a6a20","access_token":"e4fcf0346a647f10455b871630cba0fc"}
API Manager carbon log is as follows. To enable wirelogs on API Manager you can follow [1]. It is a similar process as ESB.
[2015-06-26 11:38:36,238] DEBUG - wire >> "POST /token HTTP/1.1[\r][\n]"
[2015-06-26 11:38:36,238] DEBUG - wire >> "User-Agent: curl/7.37.1[\r][\n]"
[2015-06-26 11:38:36,238] DEBUG - wire >> "Host: localhost:8243[\r][\n]"
[2015-06-26 11:38:36,238] DEBUG - wire >> "Accept: */*[\r][\n]"
[2015-06-26 11:38:36,238] DEBUG - wire >> "Authorization: Basic Vnc5cXhhWHE5WGo1Wl8xdWVvc3FEbFN0d1RBYTpJTVNsV0ZOQ01KN1JmRmtPT1RpZF9iTWpWZlFh, Content-Type: application/x-www-form-urlencoded[\r][\n]"
[2015-06-26 11:38:36,238] DEBUG - wire >> "Content-Length: 49[\r][\n]"
[2015-06-26 11:38:36,238] DEBUG - wire >> "Content-Type: application/x-www-form-urlencoded[\r][\n]"
[2015-06-26 11:38:36,238] DEBUG - wire >> "[\r][\n]"
[2015-06-26 11:38:36,239] DEBUG - wire >> "grant_type=password&username=admin&password=admin"
[2015-06-26 11:38:36,252] DEBUG - wire << "POST /oauth2/token HTTP/1.1[\r][\n]"
[2015-06-26 11:38:36,253] DEBUG - wire << "Authorization: Basic Vnc5cXhhWHE5WGo1Wl8xdWVvc3FEbFN0d1RBYTpJTVNsV0ZOQ01KN1JmRmtPT1RpZF9iTWpWZlFh, Content-Type: application/x-www-form-urlencoded[\r][\n]"
[2015-06-26 11:38:36,253] DEBUG - wire << "Content-Type: application/x-www-form-urlencoded[\r][\n]"
[2015-06-26 11:38:36,253] DEBUG - wire << "Accept: */*[\r][\n]"
[2015-06-26 11:38:36,253] DEBUG - wire << "Transfer-Encoding: chunked[\r][\n]"
[2015-06-26 11:38:36,253] DEBUG - wire << "Host: localhost:9443[\r][\n]"
[2015-06-26 11:38:36,253] DEBUG - wire << "Connection: Keep-Alive[\r][\n]"
[2015-06-26 11:38:36,253] DEBUG - wire << "User-Agent: Synapse-PT-HttpComponents-NIO[\r][\n]"
[2015-06-26 11:38:36,253] DEBUG - wire << "[\r][\n]"
[2015-06-26 11:38:36,253] DEBUG - wire << "31[\r][\n]"
[2015-06-26 11:38:36,254] DEBUG - wire << "grant_type=password&username=admin&password=admin[\r][\n]"
[2015-06-26 11:38:36,254] DEBUG - wire << "0[\r][\n]"
[2015-06-26 11:38:36,254] DEBUG - wire << "[\r][\n]"
[2015-06-26 11:38:36,349] DEBUG - wire >> "HTTP/1.1 200 OK[\r][\n]"
[2015-06-26 11:38:36,349] DEBUG - wire >> "Cache-Control: no-store[\r][\n]"
[2015-06-26 11:38:36,349] DEBUG - wire >> "Date: Fri, 26 Jun 2015 06:08:36 GMT[\r][\n]"
[2015-06-26 11:38:36,349] DEBUG - wire >> "Pragma: no-cache[\r][\n]"
[2015-06-26 11:38:36,350] DEBUG - wire >> "Content-Type: application/json[\r][\n]"
[2015-06-26 11:38:36,350] DEBUG - wire >> "Content-Length: 159[\r][\n]"
[2015-06-26 11:38:36,350] DEBUG - wire >> "Server: WSO2 Carbon Server[\r][\n]"
[2015-06-26 11:38:36,350] DEBUG - wire >> "[\r][\n]"
[2015-06-26 11:38:36,350] DEBUG - wire >> "{"scope":"default","token_type":"bearer","expires_in":3299,"refresh_token":"e8a1c130b372a0021f46bf9933a6a20","access_token":"e4fcf0346a647f10455b871630cba0fc"}"
[2015-06-26 11:38:36,352] DEBUG - wire << "HTTP/1.1 200 OK[\r][\n]"
[2015-06-26 11:38:36,352] DEBUG - wire << "Access-Control-Allow-Origin: http://192.168.1.5:80,http://192.168.10.200:80,https://dev.wso2.com,https://sup.wso2.com[\r][\n]"
[2015-06-26 11:38:36,352] DEBUG - wire << "Content-Type: application/json[\r][\n]"
[2015-06-26 11:38:36,352] DEBUG - wire << "Pragma: no-cache[\r][\n]"
[2015-06-26 11:38:36,352] DEBUG - wire << "Cache-Control: no-store[\r][\n]"
[2015-06-26 11:38:36,352] DEBUG - wire << "Date: Fri, 26 Jun 2015 06:08:36 GMT[\r][\n]"
[2015-06-26 11:38:36,352] DEBUG - wire << "Server: WSO2-PassThrough-HTTP[\r][\n]"
[2015-06-26 11:38:36,352] DEBUG - wire << "Transfer-Encoding: chunked[\r][\n]"
[2015-06-26 11:38:36,352] DEBUG - wire << "[\r][\n]"
[2015-06-26 11:38:36,353] DEBUG - wire << "9f[\r][\n]"
[2015-06-26 11:38:36,353] DEBUG - wire << "{"scope":"default","token_type":"bearer","expires_in":3299,"refresh_token":"e8a1c130b372a0021f46bf9933a6a20","access_token":"e4fcf0346a647f10455b871630cba0fc"}[\r][\n]"
[2015-06-26 11:38:36,353] DEBUG - wire << "0[\r][\n]"
[2015-06-26 11:38:36,353] DEBUG - wire << "[\r][\n]"

[1] http://suhan-opensource.blogspot.com/2015/03/how-to-get-wire-logs-from-wso2-esb.html

Thursday, May 21, 2015

WSO2 ESB - Monitor DB operations with log4jdbc

Preparing the MySQL database

1. Install MySQL database if it isn’t installed on your computer.
2. Log in to MySQL using the following command.
> mysql -u root -p
Enter password: <rootPassword>

3. Issue the following commands to create the database regdb.
create database regdb;

Configuring WSO2 ESB

1. Download WSO2 ESB 4.8.1 from here. If you already have the product zip file (wso2esb-4.8.1.zip) continue with the next step.

2. Unzip the product to a path containing no spaces in the path name. This is your <ESB_HOME>

3. Download and add log4jdbc driver.

You can find the log4jdbc driver pre-built jar files from here.
I have used log4jdbc4-1.2.jar for this tutorial.

Download and copy it to <ESB_HOME>/repository/components/lib/ directory.

4. Open log4j.properties file from terminal.
> vi <ESB_HOME>/repository/conf/log4j.properties

Append below content at the end of log4j.properties file.

# Log all JDBC calls except for ResultSet calls
log4j.logger.jdbc.audit=INFO,jdbc
log4j.additivity.jdbc.audit=false

# Log only JDBC calls to ResultSet objects
log4j.logger.jdbc.resultset=INFO,jdbc
log4j.additivity.jdbc.resultset=false

# Log only the SQL that is executed.
log4j.logger.jdbc.sqlonly=DEBUG,sql
log4j.additivity.jdbc.sqlonly=false

# Log timing information about the SQL that is executed.
log4j.logger.jdbc.sqltiming=DEBUG,sqltiming
log4j.additivity.jdbc.sqltiming=false

# Log connection open/close events and connection number dump
log4j.logger.jdbc.connection=FATAL,connection
log4j.additivity.jdbc.connection=false

# the appender used for the JDBC API layer call logging above, sql only
log4j.appender.sql=org.apache.log4j.FileAppender
log4j.appender.sql.File=${carbon.home}/repository/logs/sql.log
log4j.appender.sql.Append=false
log4j.appender.sql.layout=org.apache.log4j.PatternLayout
log4j.appender.sql.layout.ConversionPattern=-----> %d{yyyy-MM-dd HH:mm:ss.SSS} %m%n%n

# the appender used for the JDBC API layer call logging above, sql timing
log4j.appender.sqltiming=org.apache.log4j.FileAppender
log4j.appender.sqltiming.File=${carbon.home}/repository/logs/sqltiming.log
log4j.appender.sqltiming.Append=false
log4j.appender.sqltiming.layout=org.apache.log4j.PatternLayout
log4j.appender.sqltiming.layout.ConversionPattern=-----> %d{yyyy-MM-dd HH:mm:ss.SSS} %m%n%n

# the appender used for the JDBC API layer call logging above
log4j.appender.jdbc=org.apache.log4j.FileAppender
log4j.appender.jdbc.File=${carbon.home}/repository/logs/jdbc.log
log4j.appender.jdbc.Append=false
log4j.appender.jdbc.layout=org.apache.log4j.PatternLayout
log4j.appender.jdbc.layout.ConversionPattern=%d{yyyy-MM-dd HH:mm:ss.SSS} %m%n

# the appender used for the JDBC Connection open and close events
log4j.appender.connection=org.apache.log4j.FileAppender
log4j.appender.connection.File=${carbon.home}/repository/logs/connection.log
log4j.appender.connection.Append=false
log4j.appender.connection.layout=org.apache.log4j.PatternLayout
log4j.appender.connection.layout.ConversionPattern=%d{yyyy-MM-dd HH:mm:ss.SSS} %m%n

5. Edit the default database configuration (data source definition configuration URL and driverClassName) defined in the  master-datasources.xml  file located at <ESB_HOME>/repository/conf/datasources directory.

<url>jdbc:log4jdbc:mysql://localhost:3306/regdb?autoReconnect=true</url>
<username>root</username>
<password>root</password>
<driverClassName>net.sf.log4jdbc.DriverSpy</driverClassName>

Please note that the previously created regdb database is used and my root password is "root".

6. Starting the WSO2 ESB server.

To create the tables in the MySQL database automatically upon server start, issue the following command.
Run the script wso2server.bat -Dsetup (on Windows) or wso2server.sh -Dsetup (on Linux/Solaris) from the <ESB_HOME>/bin folder.

7. Verify whether the database tables are created.
mysql>use regdb;
Database changed
mysql> show tables;
+-----------------------+
| Tables_in_ regdb      |
+-----------------------+
| REG_ASSOCIATION       |
| REG_CLUSTER_LOCK      |
| REG_COMMENT           |
| REG_CONTENT           |
| REG_CONTENT_HISTORY   |
| REG_LOG               |
| REG_PATH              |
| REG_PROPERTY          |
| REG_RATING            |
| REG_RESOURCE          |
| REG_RESOURCE_COMMENT  |
| REG_RESOURCE_HISTORY  |
| REG_RESOURCE_PROPERTY |
| REG_RESOURCE_RATING   |
| REG_RESOURCE_TAG      |
| REG_SNAPSHOT          |
| REG_TAG               |
| UM_ACCOUNT_MAPPING    |
| UM_CLAIM              |
| UM_DIALECT            |
| UM_DOMAIN             |
| UM_HYBRID_REMEMBER_ME |
| UM_HYBRID_ROLE        |
| UM_HYBRID_USER_ROLE   |
| UM_MODULE             |
| UM_MODULE_ACTIONS     |
| UM_PERMISSION         |
| UM_PROFILE_CONFIG     |
| UM_ROLE               |
| UM_ROLE_PERMISSION    |
| UM_SHARED_USER_ROLE   |
| UM_SYSTEM_ROLE        |
| UM_SYSTEM_USER        |
| UM_SYSTEM_USER_ROLE   |
| UM_TENANT             |
| UM_USER               |
| UM_USER_ATTRIBUTE     |
| UM_USER_PERMISSION    |
| UM_USER_ROLE          |
+-----------------------+
39 rows in set (0.00 sec)

View log files

1. Go to <ESB_HOME>/repository/logs
2. tail -f sqltiming.log
3. Perform DB operations and view query execution stats.

e.g.: create a user role "testrole" and view the log output.

-----> 2015-05-21 15:07:20.129  org.wso2.carbon.user.core.util.DatabaseUtil.getIntegerValueFromDatabase(DatabaseUtil.java:348)
1. SELECT UM_ID FROM UM_ROLE WHERE UM_ROLE_NAME='testrole' AND UM_TENANT_ID=-1234
 {executed in 0 msec}

-----> 2015-05-21 15:07:20.130  org.wso2.carbon.user.core.jdbc.JDBCUserStoreManager.updateStringValuesToDatabase(JDBCUserStoreManager.java:2043)
1. INSERT INTO UM_ROLE (UM_ROLE_NAME, UM_TENANT_ID) VALUES ('testrole', -1234)
 {executed in 0 msec}

-----> 2015-05-21 15:07:20.133  org.wso2.carbon.user.core.util.DatabaseUtil.udpateUserRoleMappingInBatchMode(DatabaseUtil.java:497)
1. batching 0 statements:
 {executed in 0 msec}


Wednesday, May 6, 2015

WSO2 ESB - How to save a sequence in Registry

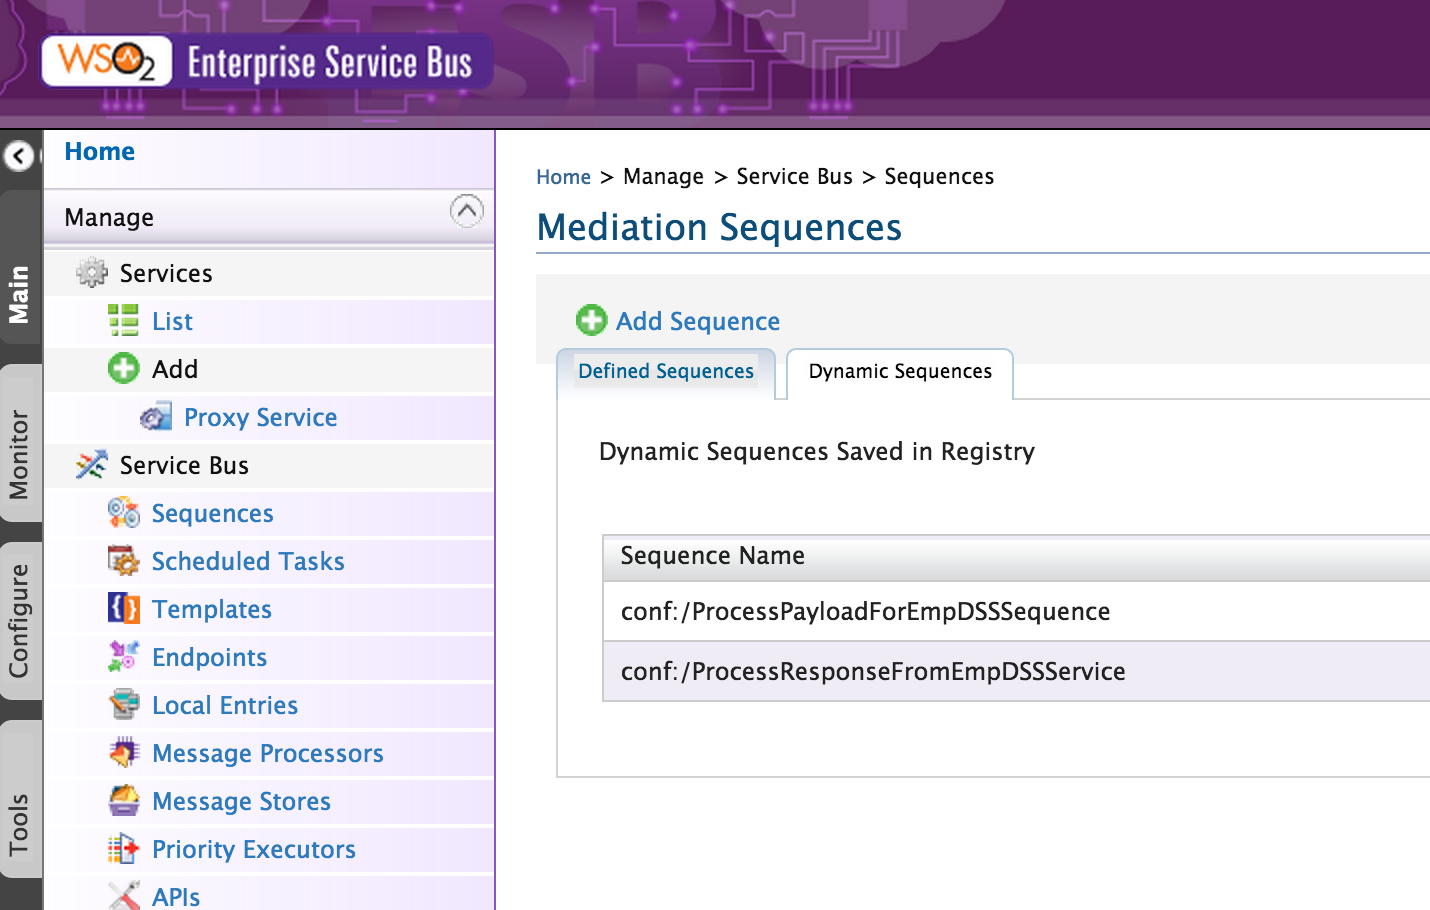
Go to ESB -> Main -> Manage -> Service Bus -> Sequences

Press add sequence


Configure your sequence and click on Save in Registry

Select Configuration Registry and click Save & Close button to save the sequence


WSO2 ESB java.lang.NullPointerException: Tenant domain has not been set in CarbonContext

When I try to invoke the secure service for NHTTP or PassThrough Transport I'm getting the following error.
WSO2 ESB wirelog is attached herewith for the reference.

[2015-05-05 11:42:11,044] DEBUG - wire >> "POST /services/StockQuoteProxy.StockQuoteProxyHttpsSoap11Endpoint HTTP/1.1[\r][\n]"
[2015-05-05 11:42:11,045] DEBUG - wire >> "Accept-Encoding: gzip,deflate[\r][\n]"
[2015-05-05 11:42:11,045] DEBUG - wire >> "Content-Type: text/xml;charset=UTF-8[\r][\n]"
[2015-05-05 11:42:11,045] DEBUG - wire >> "SOAPAction: "urn:getQuote"[\r][\n]"
[2015-05-05 11:42:11,045] DEBUG - wire >> "Content-Length: 416[\r][\n]"
[2015-05-05 11:42:11,046] DEBUG - wire >> "Host: 10.0.2.15:8243[\r][\n]"
[2015-05-05 11:42:11,046] DEBUG - wire >> "Connection: Keep-Alive[\r][\n]"
[2015-05-05 11:42:11,046] DEBUG - wire >> "User-Agent: Apache-HttpClient/4.1.1 (java 1.5)[\r][\n]"
[2015-05-05 11:42:11,046] DEBUG - wire >> "[\r][\n]"
[2015-05-05 11:42:11,046] DEBUG - wire >> "[\n]"
[2015-05-05 11:42:11,046] DEBUG - wire >> "   [\n]"
[2015-05-05 11:42:11,046] DEBUG - wire >> "   [\n]"
[2015-05-05 11:42:11,046] DEBUG - wire >> "      [\n]"
[2015-05-05 11:42:11,046] DEBUG - wire >> "         [\n]"
[2015-05-05 11:42:11,047] DEBUG - wire >> "         [\n]"
[2015-05-05 11:42:11,047] DEBUG - wire >> "            [\n]"
[2015-05-05 11:42:11,047] DEBUG - wire >> "            HTS[\n]"
[2015-05-05 11:42:11,047] DEBUG - wire >> "         [\n]"
[2015-05-05 11:42:11,047] DEBUG - wire >> "      [\n]"
[2015-05-05 11:42:11,047] DEBUG - wire >> "   [\n]"
[2015-05-05 11:42:11,047] DEBUG - wire >> ""
[2015-05-05 11:42:11,058] ERROR - ServerWorker Error processing POST request 
java.lang.NullPointerException: Tenant domain has not been set in CarbonContext
 at org.wso2.carbon.caching.impl.CacheManagerFactoryImpl.getCacheManager(CacheManagerFactoryImpl.java:79)
 at org.wso2.carbon.security.pox.POXSecurityHandler.getPOXCache(POXSecurityHandler.java:383)
 at org.wso2.carbon.security.pox.POXSecurityHandler.invoke(POXSecurityHandler.java:179)
 at org.apache.axis2.engine.Phase.invokeHandler(Phase.java:340)
 at org.apache.axis2.engine.Phase.invoke(Phase.java:313)
 at org.apache.axis2.engine.AxisEngine.invoke(AxisEngine.java:261)
 at org.apache.axis2.engine.AxisEngine.receive(AxisEngine.java:167)
 at org.apache.axis2.transport.http.HTTPTransportUtils.processHTTPPostRequest(HTTPTransportUtils.java:172)
 at org.apache.synapse.transport.nhttp.ServerWorker.processEntityEnclosingMethod(ServerWorker.java:459)
 at org.apache.synapse.transport.nhttp.ServerWorker.run(ServerWorker.java:279)
 at org.apache.axis2.transport.base.threads.NativeWorkerPool$1.run(NativeWorkerPool.java:172)
 at java.util.concurrent.ThreadPoolExecutor$Worker.runTask(ThreadPoolExecutor.java:886)
 at java.util.concurrent.ThreadPoolExecutor$Worker.run(ThreadPoolExecutor.java:908)
 at java.lang.Thread.run(Thread.java:662)
[2015-05-05 11:42:11,069] DEBUG - wire << "HTTP/1.1 500 Internal Server Error[\r][\n]"
[2015-05-05 11:42:11,069] DEBUG - wire << "Content-Type: text/xml; charset=UTF-8[\r][\n]"
[2015-05-05 11:42:11,069] DEBUG - wire << "Date: Tue, 05 May 2015 06:12:11 GMT[\r][\n]"
[2015-05-05 11:42:11,069] DEBUG - wire << "Transfer-Encoding: chunked[\r][\n]"
[2015-05-05 11:42:11,069] DEBUG - wire << "Connection: Keep-Alive[\r][\n]"

Workaround for this issue is as follows.
Alter axis2.xml i.e move CarbonContentConfigurator as first entry in Transport.
<phase name="Transport">
<handler name="CarbonContentConfigurator"
class="org.wso2.carbon.mediation.initializer.handler.CarbonContextConfigurator"/>

Tested in ESB 4.8.0

Monday, March 23, 2015

How to view WSO2 ESB synapse configuration

WSO2 ESB version used: 4.8.1

1. Login to ESB.


2. Click source view under Main tab -> Manage -> Service Bus -> Source View


3. You can directly add proxies, sequences, endpoints and many more configurations from here.