Friday, September 4, 2020

[Tuturial] Using Asgardio JavaScript OIDC Authentication SDK with WSO2 Identity Server 5.10.0

WSO2 Identity Server is an API-driven open source Identity and Access Management (IAM) product designed to help you build effective Customer Identity and Access Management (CIAM) solutions. It is based on open standards such as SAML, OAuth and OpenID Connect (OIDC) with the deployment options of on-premise, cloud, and hybrid. It supports complex IAM requirements given its high extensibility. Capabilities: SSO, Identity Federation, Multi-factor Authentication or Adaptive Authentication, and many more.

Asgardio's OIDC SDK for JavaScript [1] allows Single Page Applications (SPA) to use OIDC/OAuth2 authentication in a simple and secure way. By using Asgardio and the JavaScript OIDC SDK, developers will be able to add identity management quickly to their Single Page Applications.

For this tutorial we will be using the sample application in the above mentioned Github repo. Let's get started.

Step 1: Setup and Run WSO2 Identity Server (WSO2 IS) 

1. Download WSO2 IS from here. I have selected the "Zip Archive" option for my exercise. 


At the time of writing this article WSO2 IS latest release was 5.10.0 and this exercise was carried out with this version. 

You can find older WSO2 IS versions from this previous releases list, if you cannot find version 5.10.0 as the latest, at the time of reading this article. 

2. Extract the zip archive to your working directory and we call the wso2is-5.10.0 as IS_HOME from now on.

3. Add CORS filter to oauth2 and api#identity#user#v1.0 web.xml files.

When we are invoking a REST endpoint in oauth2 war and api#identity#user#v1.0 war from a javascript of a web app which is located in a different domain than identity server domain, we are getting No 'Access-Control-Allow-Origin' header is present on the requested resource error because this is a cross-origin request. Therefore, your web application is not allowed access. In order to get rid of this issue, you must enable this by sending the following CORS (Cross-Origin Resource Sharing) headers using a custom filter by adding the following configuration to both the web.xml files.

i. IS_HOME/repository/deployment/server/webapps/oauth2/WEB-INF/web.xml  

    <filter>
<filter-name>CORS</filter-name>
<filter-class>com.thetransactioncompany.cors.CORSFilter</filter-class>
<init-param>
<param-name>cors.allowOrigin</param-name>
<param-value>http://localhost:3000</param-value>
</init-param>
</filter>
<filter-mapping>
<filter-name>CORS</filter-name>
<url-pattern>*</url-pattern>
</filter-mapping>

If not, when you click on the Sign In button of the application, you will be getting the following error.

Access to XMLHttpRequest at 'https://localhost:9443/oauth2/token' from origin 'http://localhost:3000' has been blocked by CORS policy: Response to preflight request doesn't pass access control check: No 'Access-Control-Allow-Origin' header is present on the requested resource.

ii. IS_HOME/repository/deployment/server/webapps/api\#identity\#user\#v1.0/WEB-INF/web.xml

    <filter>
<filter-name>CORS</filter-name>
<filter-class>com.thetransactioncompany.cors.CORSFilter</filter-class>
<init-param>
<param-name>cors.allowOrigin</param-name>
<param-value>http://localhost:3000</param-value>
</init-param>
</filter>
<filter-mapping>
<filter-name>CORS</filter-name>
<url-pattern>*</url-pattern>
</filter-mapping>

If not, when you click on the Get user info button of the application, you will be getting the following error.

Access to XMLHttpRequest at 'https://localhost:9443/api/identity/user/v1.0/me' from origin 'http://localhost:3000' has been blocked by CORS policy: Response to preflight request doesn't pass access control check: No 'Access-Control-Allow-Origin' header is present on the requested resource.

5. Start WSO2 IS and login to management console using default credentials admin:admin

sh IS_HOME/bin/wso2server.sh start; tail -f IS_HOME/repository/logs/wso2carbon.log;
Management Console: https://localhost:9443/carbon

6. Go to  Main  ->  Identity  ->  Service Providers  and click  Add  to add a new service provider.

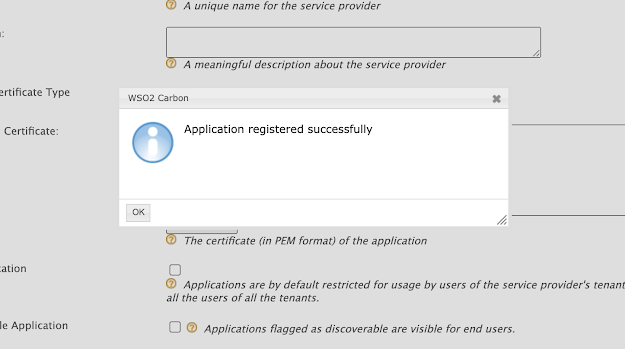
7. Add service provider name as Sample and click on the button Register


8. Expand the Inbound Authentication Configuration section. Then expand OAuth/OpenID Connect Configuration section and click on Configure.


9. Configure as follows.

i. Under Allowed Grant Types uncheck everything except Code and Refresh Token.

ii. Enter http://localhost:3000 as the Callback Url.

iii. Check Allow authentication without the client secret.


iv. Finally click Add button at the bottom.


11. Copy the OAuth Client Key. This will be added to your JavaScript application configuration later.


Step 2: Setup and Run the sample javascript OIDC application

1. Clone Github repo in [1] to your local machine.

 git clone https://github.com/asgardio/asgardio-js-oidc-sdk.git 

2. Go to directory: asgardio-js-oidc-sdk and issue the following command.

 npm run build 

You will see a response as follows.

 > asgardio-js-oidc-sdk@0.1.0 prebuild /Users/Shared/wso2/asgardioOIDCsample/asgardio-js-oidc-sdk
 > npm install && lerna bootstrap
 added 753 packages from 386 contributors and audited 753 packages in 13.512s
 ...
 lerna success run Ran npm script 'build' in 1 package in 31.6s:
 lerna success - @asgardio/oidc-js


3.  Open the index.html file and find the JavaScript section where the app logic is written.

Paste the previously copied OAuth Client Key  in front of the  clientID attribute as follows.

// Initialize the client
auth.initialize({
baseUrls: [serverOrigin],
callbackURL: clientHost,
clientHost: clientHost,
clientID: "AupLfEfrCLsa0f8yf1SGfXUmqGAa",
enablePKCE: true,
serverOrigin: serverOrigin,
storage: "webWorker"
});


If you don't correctly add the clientID you will get the following error.

Cannot find an application associated with the given consumer key : X7idgY33LQYhKoFXHmJFHhT5o7Ma


4. Run the app by entering the following command

 npm start 

> @asgardio/oidc-sample-vanilla@0.1.0 start /Users/Shared/wso2/asgardioOIDCsample/asgardio-js-oidc-sdk/samples/vanilla-js-app
> node server.js

Server listening on 3000

The application should be accessible via http://localhost:3000


5. Click on the Sign In button to login using WSO2 IS. You will be redirected to the SSO page.


For this exercise use the default credentials admin:admin to login.

6. You will be asked to provide consent for this application to access your data.

Once you press Continue, you will be redirected to the application as follows.

7. When you press the Get user info button you will get user data as follows.


-=< End of Tutorial >=-

Reference:

[1] https://github.com/asgardio/asgardio-js-oidc-sdk

[2] https://docs.wso2.com/display/IS530/Invoking+an+Endpoint+from+a+Different+Domain

Thursday, April 9, 2020

[Tutorial] WSO2 API Microgateway - Secured proxy petstore service + Docker (MacOS)

What is this WSO2 API Microgatway?
"The WSO2 API Microgateway is a lightweight message processor for APIs. The API Microgateway is used for message security, transport security, routing, and other common API Management related quality of services. It can process incoming and outgoing messages while collecting information required for usage metering and throttling capabilities. The API Microgateway natively supports scaling in highly decentralized environments including microservice architecture. An immutable, ephemeral Microgateway fits well with the microservice architecture. The API Microgateway is also capable of operating in lockdown environments such as IoT devices since connectivity from the API Microgateway to the API Management system is not mandatory."

In summary, WSO2 API Microgateway is a lightweight gateway distribution that can be used to deploy a single API or multiple APIs, i.e. WSO2 API Microgateway is a specialized form of WSO2 API Gateway.

In this use case let's see how a service can be securely proxied via WSO2 API Microgateway 3.1.0. Let's expose the publicly available petstore services (https://petstore.swagger.io/v2/ ) using the microgateway.

This use case is carried on the following environment.
  1. OS: macOS Catalina V10.15.3
  2. JAVA: Java(TM) SE Runtime Environment (build 1.8.0_162-b12)
Consider the following installation prerequisites.
  1. Docker - Mine was docker desktop community: V2.2.0.3 (42716) stable channel
    1. If you already don't have docker installed, please follow [1] and install.
    2. Once you have completed installation run docker for desktop and in terminal, run docker info and check status.
  2. WSO2 API Microgateway toolkit - Mine was V3.1.0 latest release at the time of writing this article.
    1. Go to https://wso2.com/api-management/api-microgateway/ and download TOOLKIT -> MacOS Zip Archive
    2. Extract it do a location of your choice and lets call it <MGWTK_HOME>
      e.g. /Users/Shared/wso2/packs/wso2am-micro-gw-toolkit-macos-3.1.0
    3. Append the full path including /bin to PATH environment variable as follows.
      1. With Catalina upgrade now most of you are using ~/.zprofile [2] to maintain your PATH variables. Add following two lines to this file.
        export MGWTK_HOME=/Users/Shared/wso2/packs/wso2am-micro-gw-toolkit-macos-3.1.0
        export PATH=$MGWTK_HOME/bin:$PATH
      2. Run source ~/.zprofile to refresh the changed zprofile file.
    4. Run micro-gw version
      JAVA_HOME: /Library/Java/JavaVirtualMachines/jdk1.8.0_162.jdk/Contents/Home
      3.1.0

Now let's begin.
  1. Navigate to your workspace directory of your choice.
  2. Using famous online petstore API definition lets initialize petstore project as follows.
    micro-gw init petstore -a https://petstore.swagger.io/v2/swagger.json
    JAVA_HOME: /Library/Java/JavaVirtualMachines/jdk1.8.0_162.jdk/Contents/Home
    Project 'petstore' is initialized successfully.

    (Use "micro-gw build petstore" after copying the api definitions)
    (Use "micro-gw import petstore [-l]|[-a -v]" to import APIs from WSO2 API Manager)
  3. Using tree command [3] check the newly created directory structure as follows.
    user % tree
    .
    └── petstore
        ├── api_definitions
        │   └── swagger.json
        ├── conf
        │   └── deployment-config.toml
        ├── extensions
        │   ├── extension_filter.bal
        │   ├── startup_extension.bal
        │   └── token_revocation_extension.bal
        ├── grpc_definitions
        ├── interceptors
        ├── lib
        └── policies.yaml
  4. Now build the project and the docker image as follows.
    micro-gw build petstore --docker --docker-image petstore:v1 --docker-base-image wso2/wso2micro-gw:3.1.0-alpha
    You can see the following output.
    JAVA_HOME: /Library/Java/JavaVirtualMachines/jdk1.8.0_162.jdk/Contents/Home
    Generating sources...[DONE]

    ..................................
    There are no new updates available
    ..................................
    Compiling source
    wso2/petstore:3.1.0

    Creating balos
    target/balo/petstore-2019r3-java8-3.1.0.balo

    Running tests
    wso2/petstore:3.1.0
    No tests found


    Generating executables
    target/bin/petstore.jar

    Generating docker artifacts...
    @docker  - complete 2/2 

    Run the following command to start a Docker container:
    docker run -d petstore:v1


    BUILD SUCCESSFUL
    Target: /Users/Shared/wso2/testbed/microgw-3.1.0/petstore/target/petstore.jar
  5. Now let's expose this petstore API via WSO2 API Microgateway Docker image as follows.
    docker run -d -p 9090:9090 -p 9095:9095 petstore:v1

    105edc5b762c767a3c8ddf2637754698bd3fa26527d7c7f3c25dafc05ba7f25c

    Run following command to check just to the newly created image for yourself.
    docker images
    REPOSITORY                     TAG                 IMAGE ID            CREATED              SIZE
    petstore                       v1                  34a5cb70edda        About a minute ago   288MB
    wso2/wso2micro-gw              3.1.0-alpha         8a050f202d8d        7 weeks ago          250MB
    wso2/micro-integrator          1.1.0               088477c689f6        6 months ago         315MB
  6. Invoking the API resource.
    1. Consider API resource pet/{petId}. As you can see in  https://petstore.swagger.io/v2/swagger.json, this resource is secured using an API Key in api_key header as follows.
      paths:
        '/pet/{petId}':
          get:
            security:
            - api_key: []
      securityDefinitions:
        api_key:
          type: apiKey
          name: api_key
          in: header
      Therefore let's obtain a token which will be used to invoke this API.
      TOKEN=$(curl -X get "https://localhost:9095/apikey"
      -H "Authorization:Basic YWRtaW46YWRtaW4=" -k)
        % Total    % Received % Xferd  Average Speed   Time    Time     Time  Current
                                       Dload  Upload   Total   Spent    Left  Speed
      100   621    0   621    0     0   2171      0 --:--:-- --:--:-- --:--:--  2171

      You can checkout the token as follows.
      echo $TOKEN
      eyJhbGciOiJSUzI1NiIsICJ0eXAiOiJqd3QiLCAia2lkIjoiYmFsbGVyaW5hIn0.eyJzdWIiOiJhZG1pbiIsICJpc3MiOiJodHRwczovL2xvY2FsaG9zdDo5MDk1L2FwaWtleSIsICJpYXQiOjE1ODY0MTYxNzgsICJqdGkiOiIzMjUxYTQ3OC1kYWFiLTQ2OTQtYTIzYi04NWMyYmZiYThmYjciLCAia2V5dHlwZSI6IlBST0RVQ1RJT04iLCAiYWxsb3dlZEFQSXMiOltdfQ.PJCB_XuY6F_Ph-NoMNlZRcrnXdk9-Dfflc49MRETjnzL6Z7Wyg6w4iyeNwmGkHhqk2SUqoOmZ7ZucT7ZmLMCe_ejoPVXTmvX9QtnF8gab3zE1Ww4yA8sVzCNVJWXQiPzkoiJ4yPX-e6CxEzluYQJLbL9H8icP9xpkTcck7kLo-vNqsT3gylQPBn39ZQnaFwkJeX1gFRi6G3-MwgPQhU2vRT1NAWCZdrYjPX0JB1BG_KOYUgWAbkc66UJBGgj0-b8_8eYoJ2_AmWlYEWEmpb8iK-BY6pTjYcFAEOB6Q28K-QglVSBkdTa-tQCfYkN9enJwFhd4Mr6_3pHcxQrgZ71xA
    2. Now using this newly obtained token stored in TOKEN variable let's invoke the API resource as follows. Note that I have piped json_pp at the end to pretty print json response [3].
      curl -X GET "https://localhost:9095/v2/pet/1" -H "accept: application/json" -H "api_key:$TOKEN" -k  | json_pp
        % Total    % Received % Xferd  Average Speed   Time    Time     Time  Current
                                       Dload  Upload   Total   Spent    Left  Speed
      100   201    0   201    0     0    152      0 --:--:--  0:00:01 --:--:--   152
      {
         "status" : "available",
         "photoUrls" : [
            "img/test/dog.jpeg",
            "img/test/dog1.jpeg"
         ],
         "id" : 1,
         "category" : {
            "name" : "Animal",
            "id" : 1001
         },
         "tags" : [
            {
               "name" : "Pet",
               "id" : 2001
            },
            {
               "name" : "Animal",
               "id" : 2002
            }
         ],
         "name" : "doggie"
      }
You have completed this tutorial.

For more information on WSO2 API Microgateway and documentation please follow the link below.


References: